
If your laptop has started dragging its feet when you open a dozen browser tabs, adding more RAM is one of the most effective fixes you can do yourself. Swapping in a fresh memory module takes less than half an hour once you know what you’re doing, and you do not need to be a tech enthusiast to pull it off. This guide walks through the entire process — from checking compatibility to booting up with your new memory — with step-by-step instructions drawn from official manuals and manufacturer walkthroughs.
Kingston Technology’s official RAM installation walkthrough emphasizes that ESD protection is non-negotiable even for experienced users. A single static shock can kill a new module before you ever get it seated properly.
Typical Tools Needed: Phillips screwdriver · Common Slot Count: 1-2 slots · Installation Time: 15-30 minutes · Supported Brands: Dell, HP
Quick snapshot
- Power off laptop and unplug from outlet
- Check model compatibility before buying
- Buy matching DDR-type RAM (Kingston)
- Remove bottom panel with plastic pry tool
- Release clips on existing RAM module
- Insert new SODIMM at 45-degree angle
- Boot laptop and open Task Manager
- Verify recognized capacity
- Run Windows Memory Diagnostic if needed
- Slot A must be populated first on Dell
- Notch alignment is critical — check twice
- Two clicks confirm secure seating
The specification table below summarizes memory types, speed ranges, and brand-specific configurations for the laptop models covered in this guide.
| Specification | Detail |
|---|---|
| Memory Type (Laptop) | SODIMM (vs. DIMM for desktops) |
| Supported Generations | DDR2, DDR3, DDR4, DDR4L, DDR5 |
| Dell Inspiron 5500 Speed | DDR4 at 2666 MHz |
| Maximum Modern RAM Speed | Up to 7,000 MHz (DDR5) |
| Dell Slot Configuration | Slot A is primary; Slot B alone will not boot |
| HP 14-dq1035cl Default | 12GB (4GB + 8GB modules) |
| Insertion Angle | Approximately 45 degrees |
| Successful Install Confirmation | Two audible clicks from retention clips |
| Primary Tool Required | Phillips head screwdriver |
| HP 14 Fq0028 Stock | DDR4 8GB from factory |
How to install memory on laptop?
Prepare your laptop
- Unplug the laptop from the power outlet completely
- Remove the battery before touching any internal components
- Press and hold the power button for five seconds to discharge residual electricity
- Ground yourself by touching an unpainted metal surface — this prevents electrostatic discharge that can destroy memory chips
Kingston Technology’s official RAM installation walkthrough emphasizes that ESD protection is non-negotiable even for experienced users. A single static shock can kill a new module before you ever get it seated properly.
Static electricity that you cannot feel can still damage sensitive memory circuitry. Grounding yourself costs nothing and protects a component worth considerably more than the time you spend taking precautions.
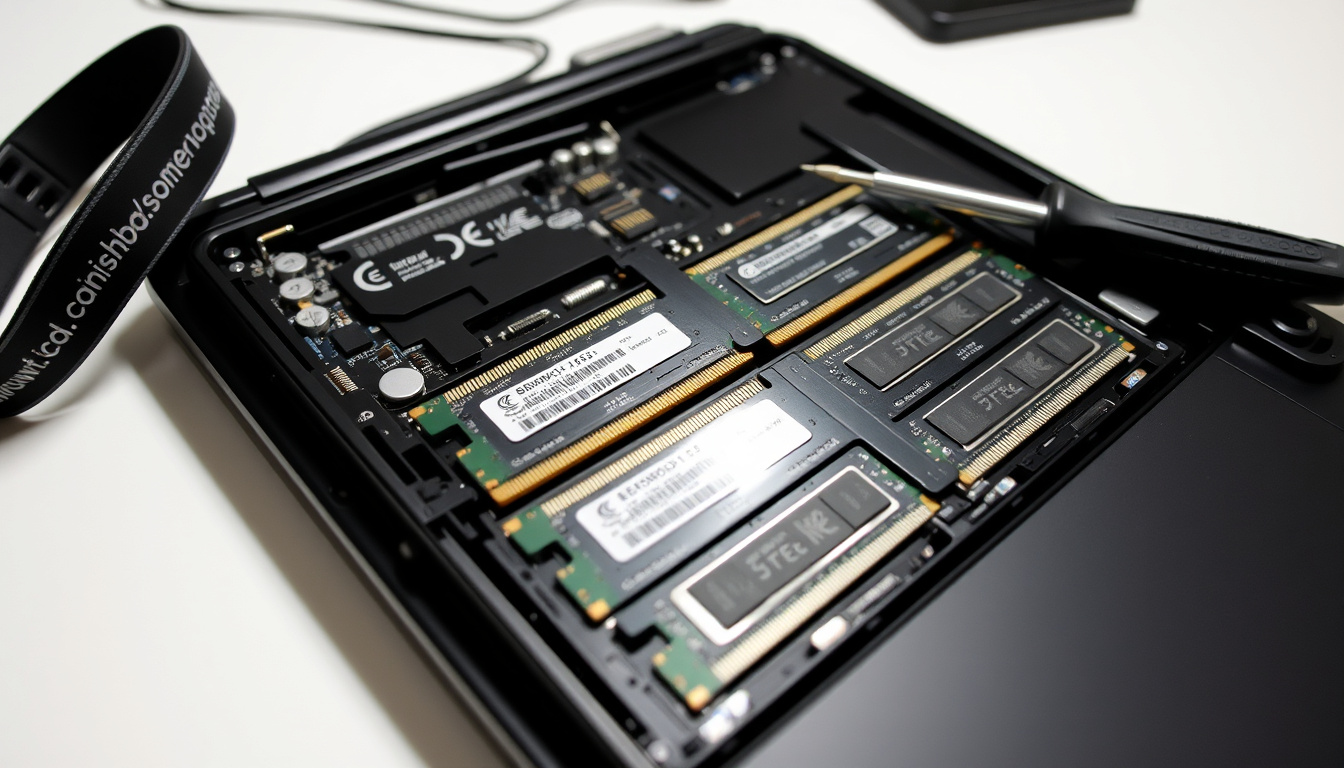
Locate RAM slots
- Flip the laptop over and identify the bottom panel secured by small screws
- Use a plastic pry tool — not a metal screwdriver — to release plastic clips around the panel edge
- On most Dell Inspiron models, two DDR4 SODIMM slots sit accessible after panel removal
- On HP models like the 14 Fq0028, memory slots are reachable from the bottom chassis without full disassembly
The Dell Inspiron 5500 features two memory bays, and the same layout appears across many Inspiron variants. HP’s consumer models typically follow a similar two-slot configuration, though the exact location varies by product line.
Insert the RAM module
- Remove any pre-installed module by pushing the metal retaining clips outward on both sides
- Align the notch on the SODIMM module with the ridge inside the memory slot — orientation matters
- Tilt the module to approximately 45 degrees and slide it into the slot until it stops
- Press the module down firmly until both side clips snap into place with an audible click on each side
Two distinct clicks signal that the retention clips have engaged properly. If you hear only one click, the module is not fully seated — remove it and try again.
Installing memory into a laptop PC is easy. Align the notch, insert at an angle, and press down until the clips lock. — Kingston Technology support documentation
Verify installation
- Reattach the bottom panel, ensuring all screws are snug and clips are secured
- Reinsert the battery and reconnect the power adapter
- Power on the laptop and watch the screen for boot within five to ten seconds
- If no display appears, shut down and reseat the memory module — the notch may not have aligned correctly
After the system boots, open Task Manager and check the memory total under the Performance tab. The reported capacity should match what you installed. Running Windows Memory Diagnostic provides additional confirmation if anything seems off.
Can I install laptop RAM myself?
Check compatibility first
- Determine your laptop model and the maximum RAM capacity it supports
- Verify the memory type your system requires — most modern laptops use DDR4 SODIMM
- Use Kingston’s online compatibility tool to identify which modules work with your specific machine
- Check whether your model allows user upgrades — some ultra-thin laptops solder memory directly to the board
Most mainstream Dell and HP laptops sold in the consumer and business segments are designed for user-installable memory. Official Dell support documentation distinguishes between memory upgrades (adding modules alongside existing ones) and memory replacements (swapping old modules for higher-capacity ones) — both are within reach for a careful DIYer.
Tools required
- Phillips head screwdriver is the primary tool for virtually every laptop RAM installation
- A plastic pry tool helps release the bottom panel without scratching the chassis
- An anti-static wrist strap is optional but provides extra reassurance during winter months when indoor humidity drops
Common pitfalls
- Forcing a module into the slot without checking notch alignment — this can damage the contacts permanently
- Skipping the battery disconnection step — this leaves the system board energized during the install
- Placing memory in Slot B without populating Slot A first — on Dell Inspiron laptops, the system will not boot if Slot A is empty
Some laptop manufacturers intentionally restrict user access to memory slots, particularly in ultra-thin designs where every millimeter counts. Always verify your specific model’s service manual before assuming the bottom panel leads directly to upgradeable RAM.
Which RAM slots should I use?
Slot 1 and 3 or 2 and 4?
- Most consumer laptops have only one or two SODIMM slots labeled Slot A and Slot B
- Slot A is always the primary slot — the system looks here first during boot
- On Dell Inspiron laptops specifically, DIMM slot A is the primary slot where the first memory stick must be installed; placing memory in slot B without slot A populated prevents computer boot entirely
- If your laptop came with 8GB soldered to the board and one open slot, that open slot is typically Slot B — you install your upgrade there
Dual channel setup
- Dual channel mode activates automatically when two matching modules are installed in the correct slots
- For dual channel to work on Dell systems, both slots A and B must be populated with modules of the same speed and capacity
- Consult your motherboard manual or Dell’s official documentation for your specific model to confirm the correct slot pairing
Firmly press the RAM into the slot until both clips snap. DIMM slot A must be populated first. — Dell Inspiron official service guide
Can I put a 16GB and 8GB RAM together?
Mixing sizes and speeds
- Mixing module sizes — for example, pairing an 8GB stick with a 16GB stick — is technically possible but comes with trade-offs
- The system will run both modules at the speed of the slower module
- Mixing different RAM speeds in the same laptop can cause performance issues and system instability
- Matching speed and type is the safest path even when mixing sizes
Desktop computers use DIMM memory modules while laptops use SODIMM modules, with significant physical size differences between the two types. Attempting to install a desktop DIMM into a laptop slot physically will not work and risks damaging the contacts.
Desktop vs laptop differences
- SODIMM modules are roughly half the length of standard DIMM modules
- System boards are designed to support only one generation of system memory — DDR2, DDR3, DDR4, DDR4L, or DDR5 — and mixing generations is not possible due to notch position differences
- The HP 14-dq1035cl shipped with a mixed configuration of one 4GB module and one 8GB module from the factory, demonstrating that manufacturers themselves combine different-sized modules
Can I upgrade my laptop RAM from 4GB to 16GB?
From 8GB to 16GB
- Many laptops with 4GB onboard have one open SODIMM slot that accepts an 8GB upgrade stick
- HP 15-ac000 and HP 14-cm0033 laptops reportedly support DDR4 RAM upgrades from 4GB to 8GB or 16GB configurations
- Dell Inspiron laptops with 8GB onboard memory can be upgraded to 12GB, 16GB, or 24GB total by adding SODIMM RAM sticks of 4GB, 8GB, or 16GB respectively
- Always verify your model-specific maximum capacity using the manufacturer’s compatibility tool before purchasing
Brand specifics Dell HP
- Dell Inspiron 5500 uses DDR4 memory operating at 2666 MHz — installing a slower DDR4 module will work but the system will throttle it down to match
- The Dell Inspiron 14 5445 features removable memory modules with step-by-step installation procedures documented in official Dell tutorials
- HP 14 Fq0028 laptops contain DDR4 RAM with 8GB capacity and feature memory DIMM slots accessible from the bottom chassis
Virtual RAM alternative
- Windows can use a portion of your storage drive as virtual memory, but this runs significantly slower than physical RAM
- Virtual RAM is a stopgap, not a substitute — if your system regularly runs out of physical memory, a RAM upgrade delivers a noticeable real-world performance improvement
- Upgrading laptop RAM from 4GB to 8GB or 16GB reportedly improves Windows performance, Chrome speed, and light gaming capability according to documented user benchmarks
Confirmed facts
- Steps from Kingston, Dell, and HP official guides are consistent and widely validated
- User-installable on most mainstream Dell Inspiron and HP consumer models
- SODIMM notch alignment is critical — misorientation causes immediate boot failure
- Slot A must be populated first on Dell systems to boot successfully
What’s unclear
- Exact maximum RAM capacity without running a model-specific compatibility checker
- Slot configuration patterns vary significantly by brand and product line — universal rules do not apply
- BIOS verification procedures after installation are not standardized across manufacturers
Related reading: NBN Fibre Upgrade Guide · DOC to PDF Free Online Tools
youtube.com, instructables.com, youtube.com, youtube.com, youtube.com, youtube.com, youtube.com, youtube.com, dell.com, dell.com, youtube.com, dell.com
Before sourcing compatible modules for your laptop upgrade, start by checking your RAM slots to confirm available capacity and slot types.
Frequently asked questions
What tools do I need to install laptop RAM?
A Phillips head screwdriver is the primary tool. A plastic pry tool helps release the bottom panel without scratching, and an anti-static wrist strap offers extra protection against electrostatic discharge.
How do I check if my laptop RAM is upgradeable?
Run your exact model number through the manufacturer’s support site or Kingston’s online compatibility tool. Some ultra-thin laptops solder memory directly to the board — if your service manual does not show accessible SODIMM slots, a physical upgrade is not an option.
What happens if I install incompatible RAM?
If the memory type or generation does not match — for example, installing DDR3 in a DDR4-only system — the laptop will not boot and the module will not seat properly. Mixing speeds works but forces the system to run all modules at the slowest speed present.
How to free up RAM if full without upgrading?
Close unused browser tabs, restart applications periodically, and disable startup programs you do not need. Windows Task Manager shows which processes consume the most memory. Virtual RAM via a storage drive is an option, but it is significantly slower than physical RAM.
How to test new RAM after installation?
Boot into Windows and open Task Manager to verify the reported memory total matches what you installed. Run Windows Memory Diagnostic or a third-party stress-testing tool like MemTest86 to check for errors under load.
Can all laptops be opened for RAM upgrade?
No. Many ultra-thin designs and soldered-memory configurations seal the RAM beneath the chassis with no user-accessible panel. Always verify your specific model’s service documentation before assuming a physical upgrade is possible.
Thomas Webb leads fact-checking, source verification and corrections at Southern Monitor.